Showing posts with label Fly Tying. Show all posts

Monday, March 26, 2012

Introducing The Booby Frog (Top-Water Bass Fly)

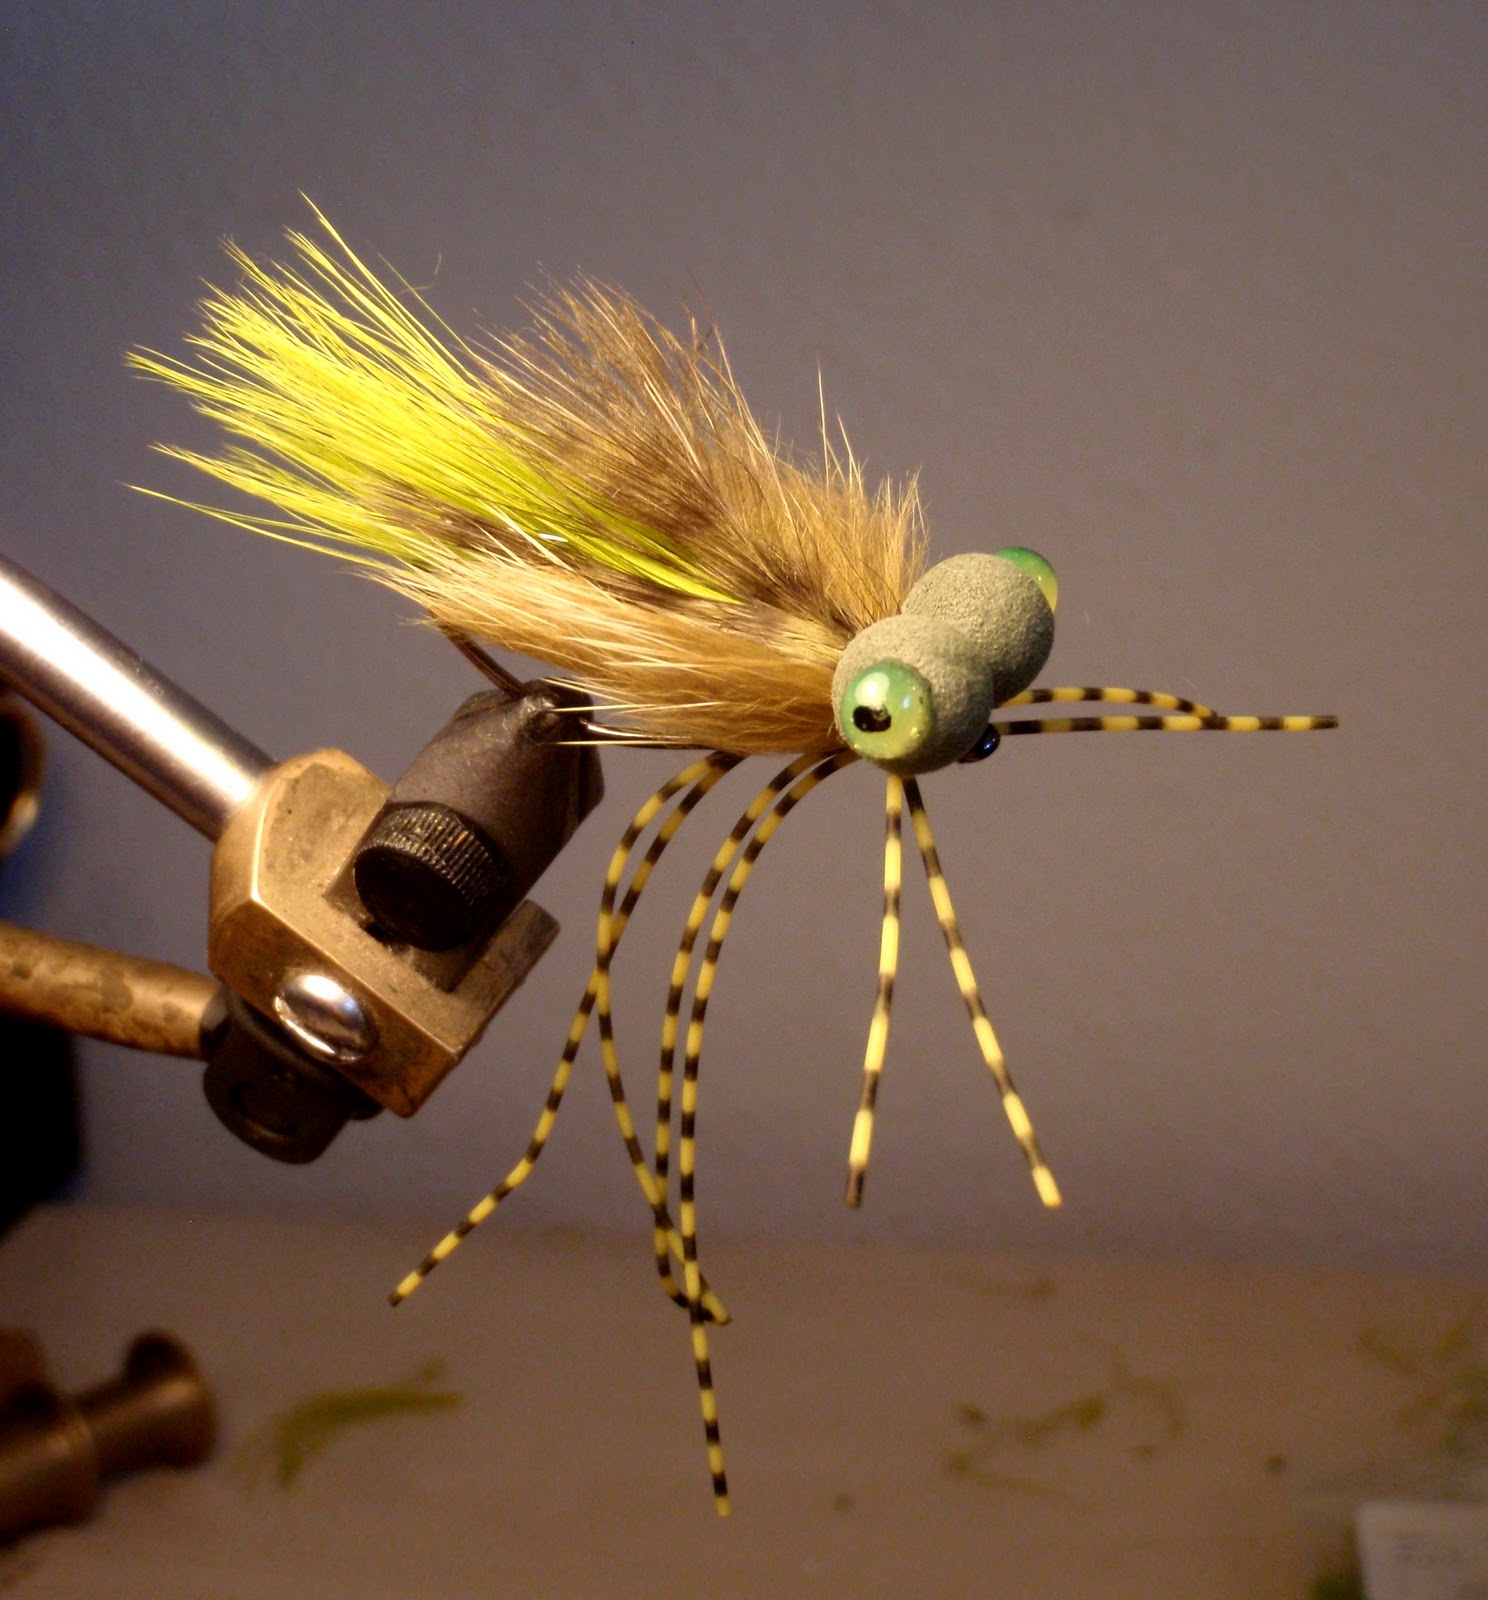
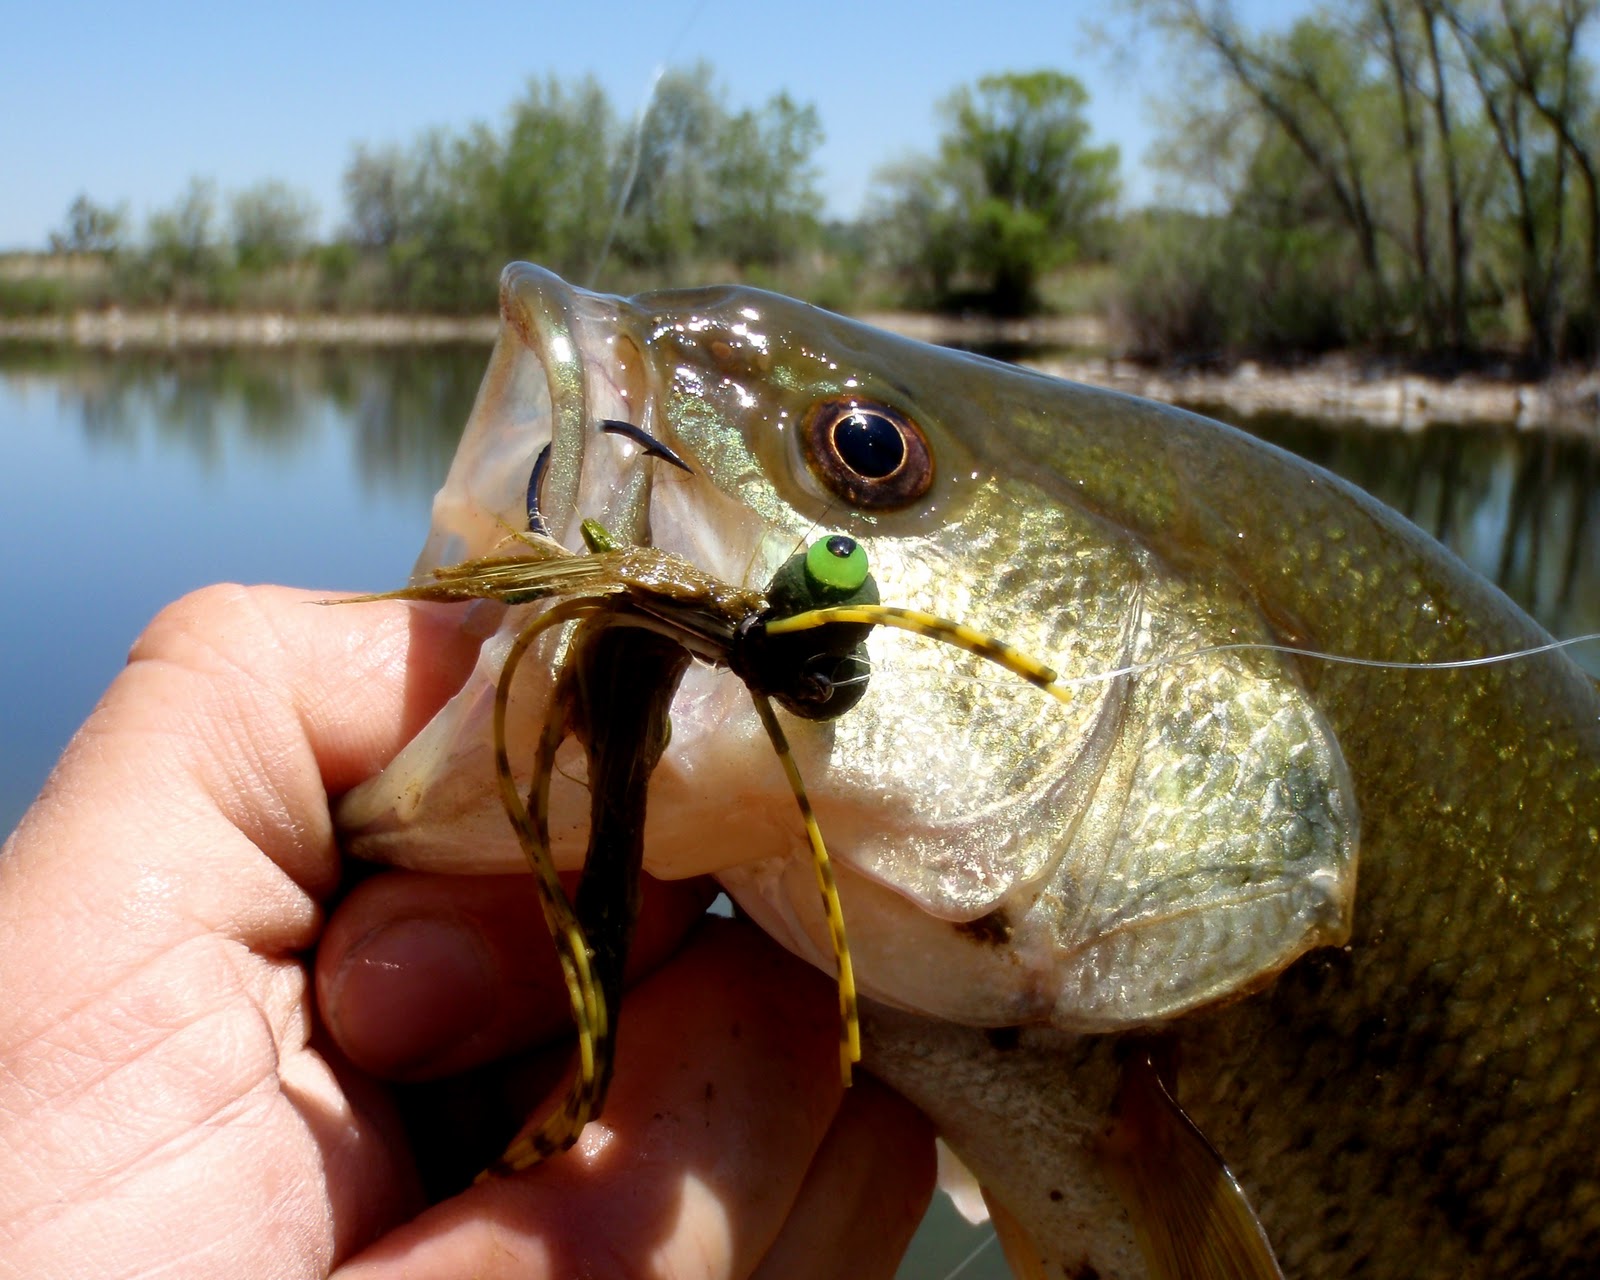
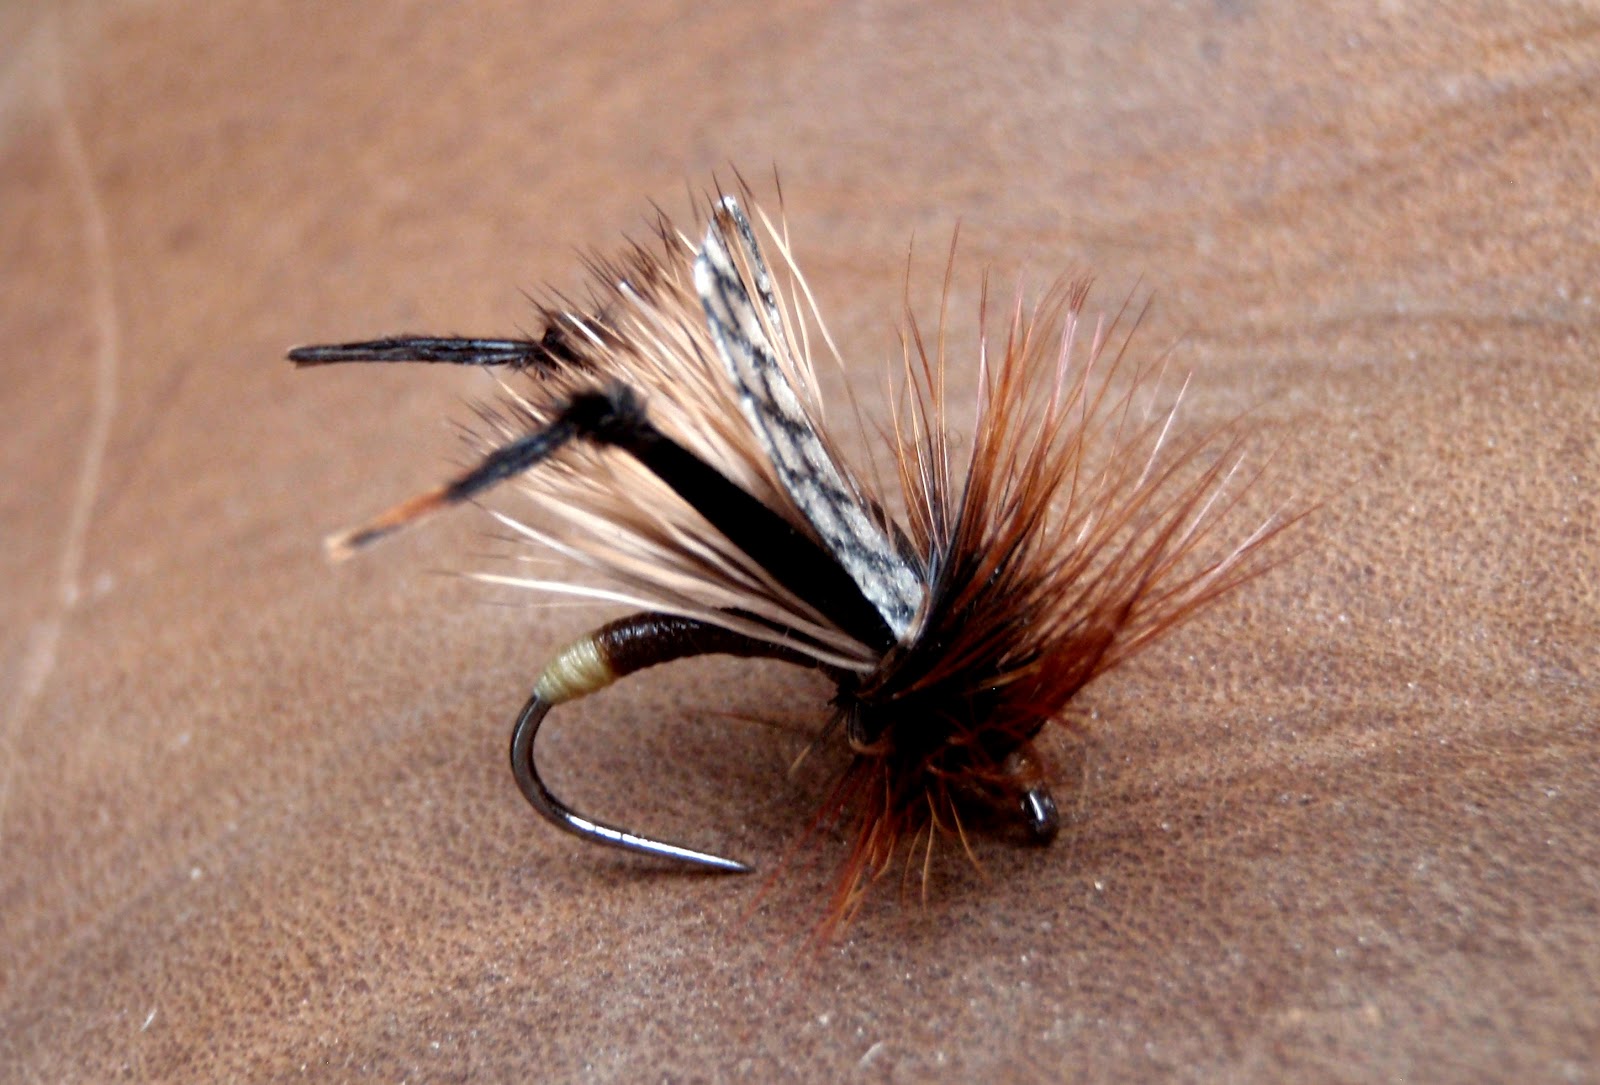
The Booby Frog fly was designed to look, move and float the way a real frog does on a pond, but stay easy to cast with a lighter fly rod and remain completely snag free. Arguably the most common and enjoyable type of top-water bass fly is some sort of cork or spun deer hair popper tied with the general size, shape and color of a frog. These flies have the ability to fool many un-pressured fish, but lack the subtlety and movement to do well on every body of water and in all seasons. Like a real frog, the Booby Frog does not always float…and when it does, it sets in the surface film of the pond at a 45 degree angle with it’s legs splayed out and just the big foam eyes popping out of the water. And the fisherman need only touch the fly line to get the front-facing rubber legs to twitch back—often being just the right trigger for the big bass lurking nearby. This fly has so much great movement and action in the water because the natural materials are not bound to the entire length of the hook shank. The Booby Frog is tied on a large stinger-style hook, but all the materials are tied in at the same 3/16th of an inch of the hook shank directly behind the eye of the hook—this allows the frog body no restrictions in movement. Also, this frog may be the first ever to offer the bass fisherman a top water fly that rides hook point up (almost out of the water!) completely eliminating the need for any cumbersome and distracting hard-mono weed guards that only partially work. The Booby Frog casts easily with a common trout-weight fly rod and crawls easily and seductively over even the thickest weed beds, logs and lily pads.


Booby Frog Recipe:

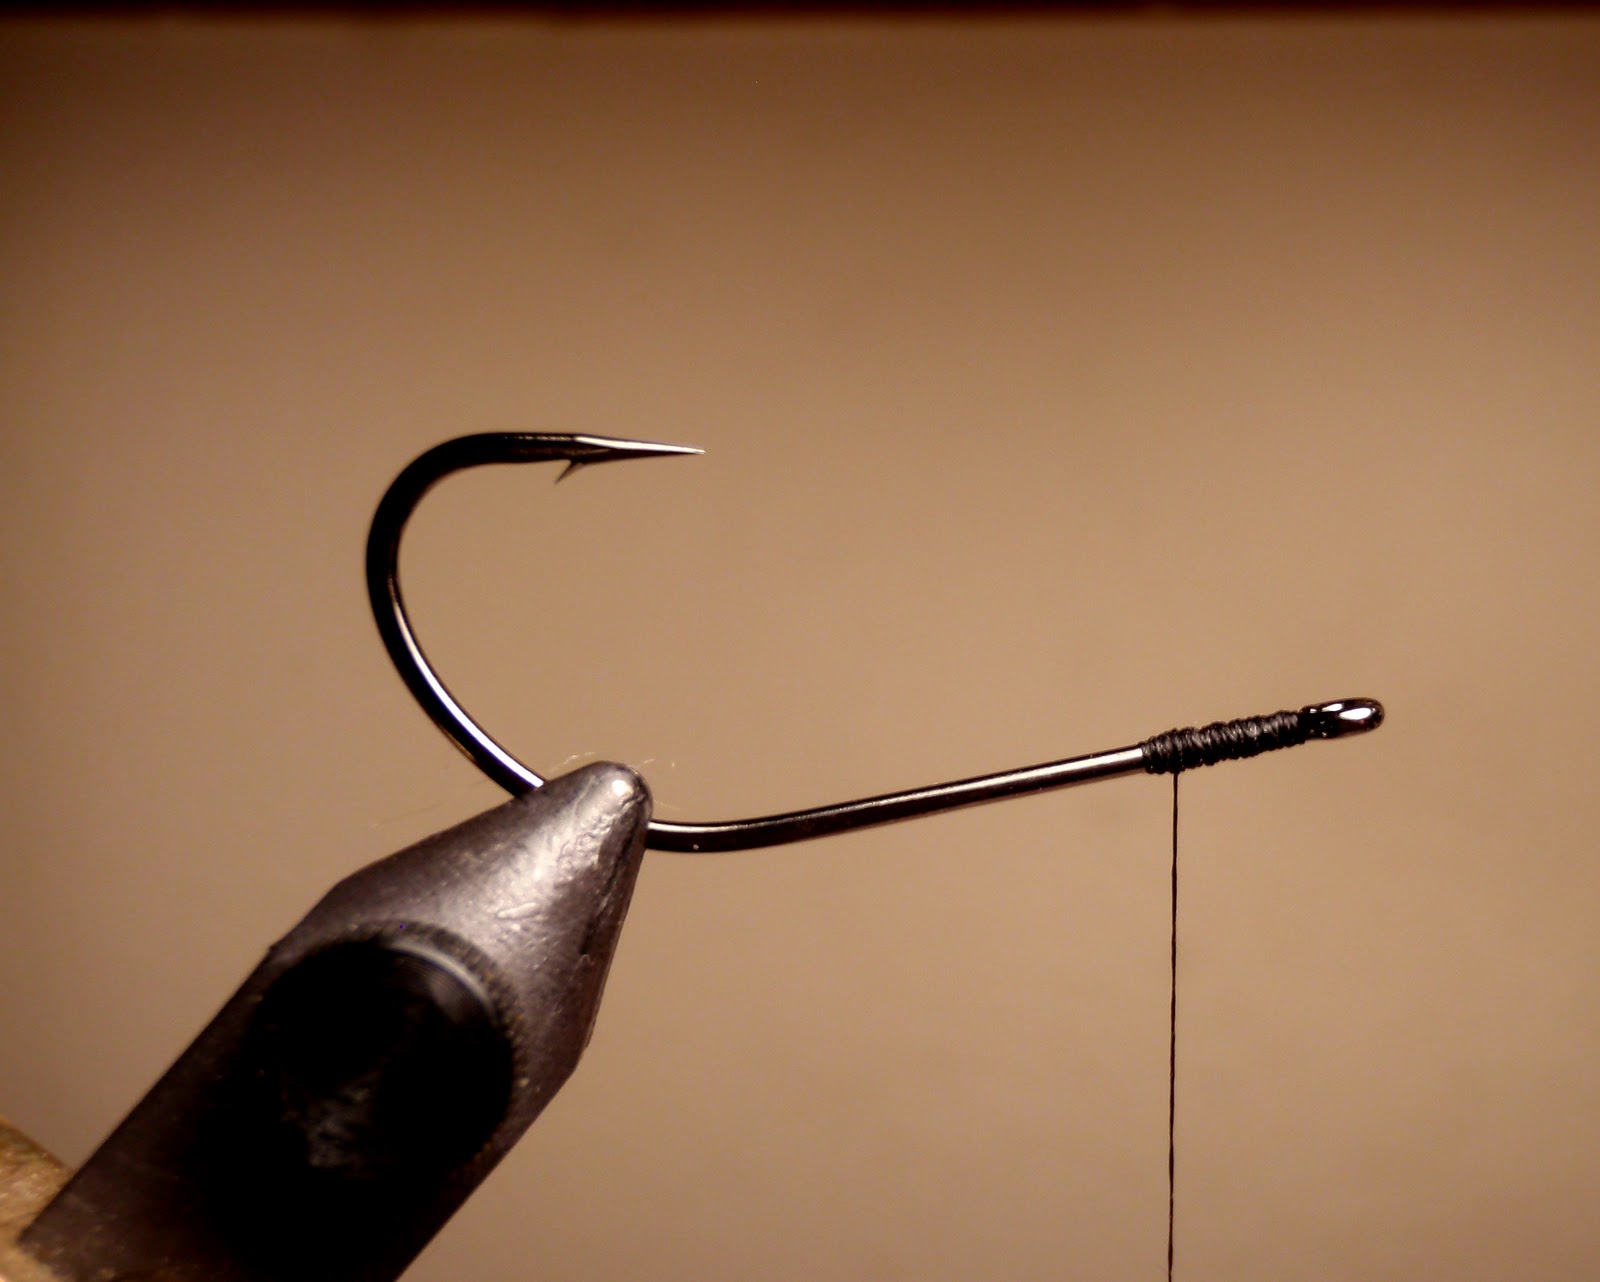
Hook: Gamakatsu B10S Size 2
Thread: Danville’s 3/0 Waxed Monocord (Dark Gray)
Body Bottom: Marabou (Cream) Wapsi (MB002)
Body Middle: Marabou (Golden Olive) Hareline Dubbin, Inc. (M8BQ159)
Body Sides: Mink (or Squirrel) Zonker Strips (Olive Brown) Wapsi (MKZ089)
Body Top: Grizzly Marabou (Olive) Hareline Dubbin, Inc. (GRIZM263)
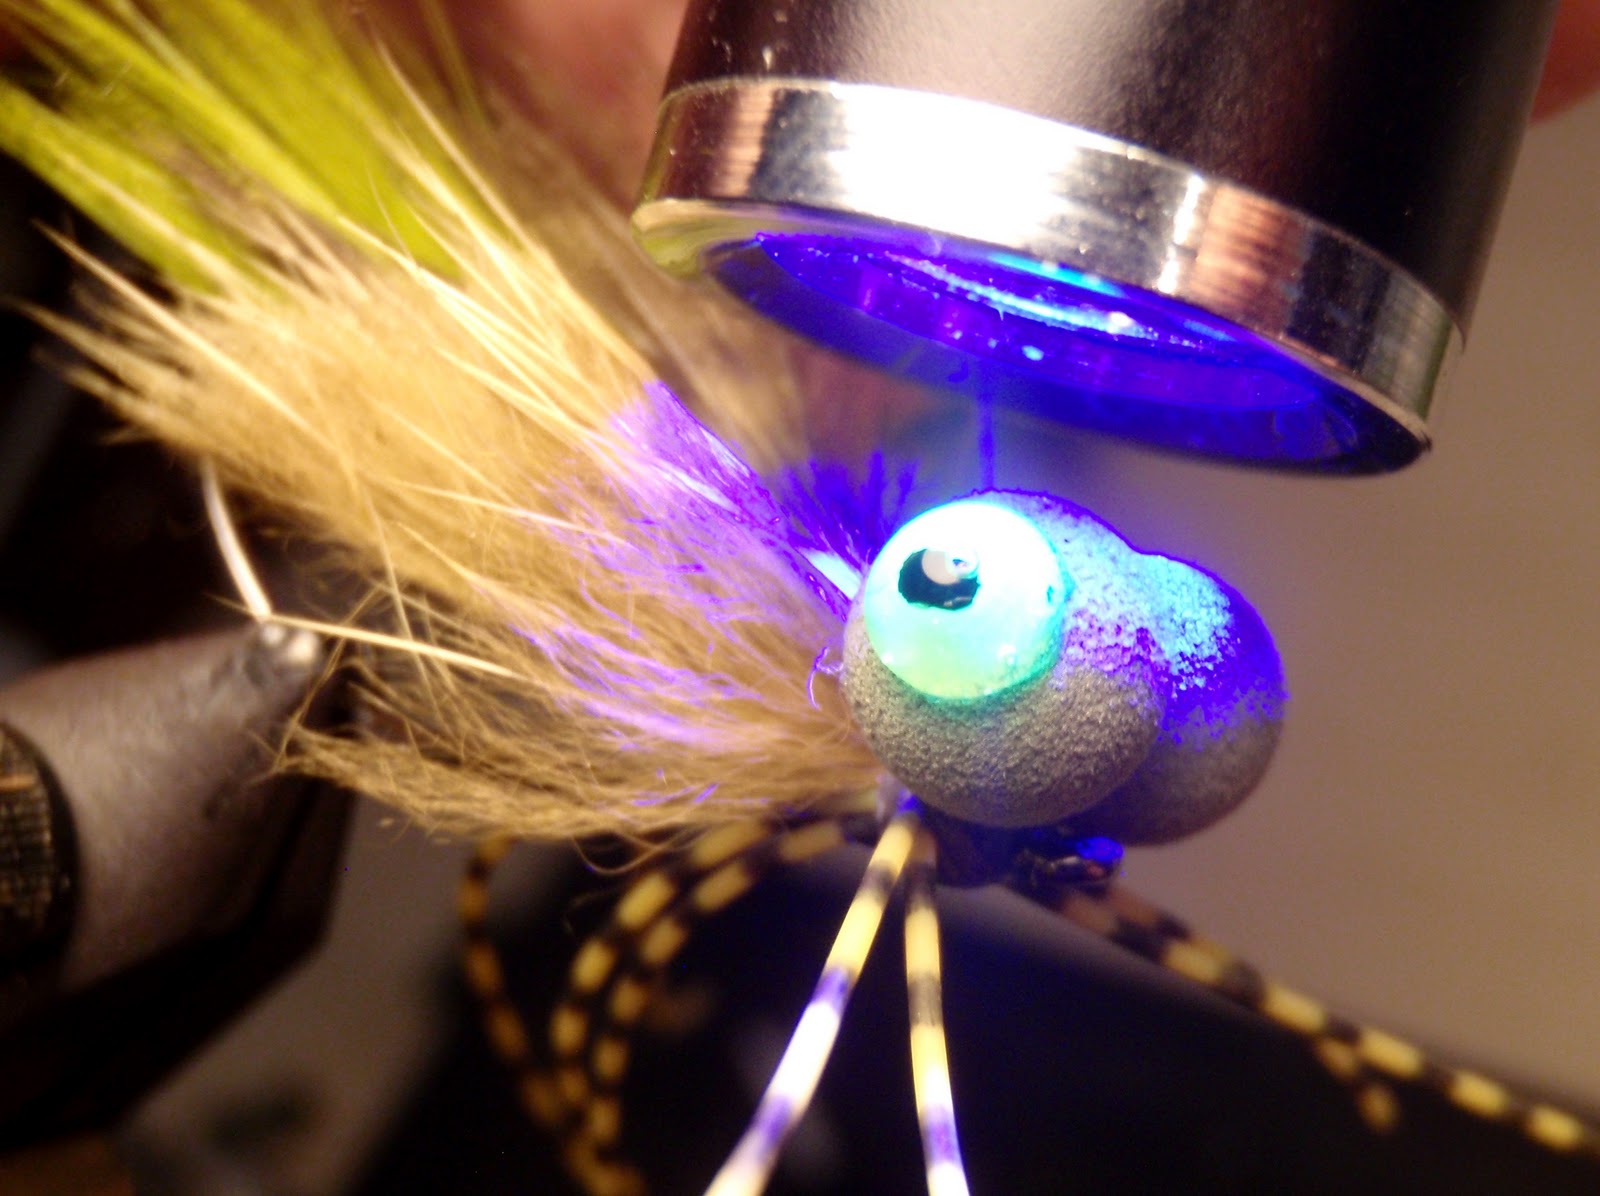
Foam Eyes: Rainy’s Olive Foam Boobie Round Eyes X-Large (BE-09144)
Legs: Montana Fly Centipede Legs (Speckled Yellow Medium) (0-5-125-807-2)
Hard Eyes 1: Loon Outdoors UV Fly Paint (Yellow)
Hard Eyes 2: Black Sharpie Marker
Hard Eyes 3: Loon Outdoors UV Fly Finish (Clear) (Or UV Knot Sense)


Booby Frog Tying Instructions:


Step 1: Build a 3/16th inch thread base directly behind the eye of a Gamakatsu B10S Size 2 hook using Danville’s 3/0 Waxed Monocord (Dark Gray).


Step 2: Tie in the Marabou (Cream) so that the tips just touch the inside bend of the hook. Apply some Zap-A-Gap to the trimmed butt sections and wrap the tread around the marabou cluster and force it up at a 45 degree angle from the hook shank—the glue should help hold it in place.

Step 3: Tie in two clumps of Marabou (Golden Olive) on top of the cream marabou. These should extend out well past the cream marabou and 5/8th of an inch past the outside bend of the hook, making the overall length of the fly—without the legs—3 inches. Lick your fingers and slick back the marabou allowing you better control of the material.

Step 4: Tie in a Mink (or Squirrel) Zonker Strip (Olive Brown) to either side of the fly. Trim the leather part of the zonker strip to ½ inch. This should make the overall zonker about 2 inches long. 
Step 5: Tie in two Grizzly Marabou (Olive) feathers on the top of the fly.

Step 6: Mount the Olive X-Large Foam Boobie Round Eyes onto the head of the fly using cross wraps of thread just as you would when mounting a lead dumbbell eye.

Step 7: Flip the fly over and tie in two sets of Medium Speckled Yellow Centipede Legs. Tie them in so that they extend out well past the hook eye and the rear of the fly. Tie off the thread between the foam eyes and the rubber legs using an extended-reach whip finish tool. Trim the front four legs to 1 inch. Trim the rear four legs to 2 inches. Apply a small amount of head cement to the thread built up between the two sets of rubber legs. Be careful not to get any cement on the actual rubber legs, as this will “rot off” the legs over time.

Step 8: Exaggerate the hole that runs through the foam Boobie eye so that the UV Fly Paint can ooze down in and have a better, more durable hold on the foam once cured. I prefer the butt end of my whip finish tool because it is already handy.

Step 9: Apply a small drop of UV Fly Paint (Yellow) into the opening of the foam eye.

Step 10: Cure the UV Fly Paint with the Loon Outdoors UV Power lamp.

Step 11: Create pupils using a Black Sharpie Marker.

Step 12: Apply a small amount of UV Fly Finish (Clear) (Or UV Knot Sense) over top of the now hardened eye. This ensures the black Sharpie pupil remains permanent.

Step 13: Cure one last time with the Loon Outdoors UV Power lamp. Finish with a final coat of Hard-as-Hull head cement to get a glossy look to the eyes.


Now go take him fishing!

Tuesday, March 20, 2012

Finesse Worms for Aggressive Early Season Bass

The snow has been sun cleared from the flat lands here in Colorado and the warm-water lakes are turning on. Pack a fast six-weight and some streamers in the car or truck so you can hit a local bass pond on lunch break or after work. The problem with the local-pond reprieve is, unless you know a secret gem or have access to private water, you will have to share your bass with others. This sometimes means you have to approach the situation from a slightly different angle (pun most certainly intended) than every other dude on lunch break. Back in the day—when I was stationed in North Carolina—the conventional lure of choice was a small and straight soft plastic like a mini Slug-Go worm or Bass Assassin jerkbait. We would rig it with no weight and fish it with a series of hard jerks that gave the worm a lively “walk-the-dog” action triggering aggressive strikes from normally tentative and educated bass. The fly rod version of this is a dubbing Finesse Worm. My favorite color combination is a dark olive Simi-Seal dubbing with a hot yellow Ice Dub for the tip. Use a two strand dubbing loop if you are using a 3/0 waxed monocord, or a four strand dubbing loop if you are using a 6/0 thread. This will provide certain rigidity to the finished worm, minimizing fouling tendencies and aiding in the flies ability to stay straight and “glide” farther after every aggressive strip during the retrieve. Make the worm from 3 ¼ to 3 ½ inches long and tie it on a Tiemco 777SP #4 hook. This is the ideal hook because it has a large, straight eye protruding out of a long, straight shank—perfect for jerkbait-type action. Tie an exaggerated thread head on these worms and even go so far as to add some Loon UV fly paint (or Knot Sense) or epoxy to create a tapered cone at the front…also to aid in the darting action. Fish the Finesse Worm on a nine foot 0x leader and use a Rapala knot or some other loop knot that will allow the fly to dart erratically

Thursday, March 8, 2012

Tying The Curmudgeon Crumpler

The Curmudgeon Crumpler may be the best trout dry fly you have yet to hear about. The “Crumpler” was originally created in an attempt to mimic large, gangly crane flies hatching in the high lakes of Colorado’s Indian Peaks Wilderness Area…but soon morphed into a more compact, hardy fly resembling a cricket or small grasshopper. This fly is tied on an Umpqua C300BL barbless competition hook, so has a very organic curve and an extended spear to hold trout without damaging them. This is my personal favorite fly to fish small, wild trout streams.


Step 1: Create a thread abdomen with 6/0 UNI-Thread (Light Cahill) on an Umpqua C300BL hook. Build up the back end significantly more than the rest. Half hitch and cut thread.


Step 2: Switch thread to a Danville's 3/0 Brown and fill out rest of the tapered abdomin. Coat entire thread base with a heavy layer of Hard-as-Hull head cement and let dry thoroughly.
Step 3: Stack a healthy clump of natural elk hair so tips are even, then tie in on top of hook shank.
Step 4: Tie a knot in two pieces of turkey tail feather so the knot is just above the color change in the natural feather fibers. Tie in and trim to proper length. Coat trimmed tips with head cement to keep them durable.
Step 5: Cut out two tapered oval wings from a sheet of MFC Wing Material (Plain Web) and tie them in on top of elk hair.
Step 6: Tie in a piece of badger hackle, then dub the thorax using black Hare-Tron dubbing.
Step 7: Wind hackle forward and tie off. Whip finish knot. Pow. Done.
Now tie up a half dozen of these in preparation for the season!


Pattern Created by
Erin Block

Tuesday, December 27, 2011

USING DENIER TO STANDARDIZE FLY TYING THREAD

By. Christopher Helm

In the late 1930's, the Chenille Company created the "aught"( 3/0,6/0, 8/0, etc.) system to indicate the size of thread. This was based on a system where the number or "aught" was the base point and as the thread became smaller additional zeros were added indicating that the thread was finer. As an example, a thread with six zeros ( 000000) translated to a 6/0 thread. As other thread distributors were born after the early 1960's, they followed the same system which was assigning a standard that does not provide as accurate a measurement for the fly tier as denier. In 1988, Tom Schmucker of WAPSI Fly, Inc. in Mountain Home, Arkansas introduced a nylon thread simply called 70 UTC and 140 UTC based on denier, which is the method of measuring thread. This is the system that the garment industry uses for thread to sew clothing. Denier is defined as the weight in grams of 9000 meters of nylon, polyester, rayon thread, etc. There is a correlation between denier and breaking strength of nylon and polyester thread, the smaller the denier number the lower pound/ounce breaking strength of the thread. At the present time, about the smallest denier nylon or polyester for fly tying thread is 40, which would be used for tying midges. The one exception to this denier vs. breaking strength rule is that gel spun polyethylene thread is two to three times stronger that nylon or polyester of the same denier. This transition to a denier rating system will take several years to be completed. Danville and Gudebrod are committed to making changes as they order new labels. UNI-Products has already begun the transition. 

Thursday, December 22, 2011

Sculpin Helmet

As a fly tier and serious streamer fisherman I was very interested in the weighted Fish Skulls that hit the scene a couple years ago. I received my sample pack at the fly shop and tied two big baitfish streamers and crammed the weighted scull onto the front. They both looked great. I really liked the fact that I could wrap some schlappen or rabbit strip tight behind the hook eye and then mount the head from the front, pushing all the material back once the fly was finished. But there was only so much room for innovation. Besides, I have been really into articulated streamers weighted so they ride hook point up…and just couldn’t do that easily with the original Fish Sculls. Now the company has pushed the envelope a bit more with the Sculpin Helmets. These are about the same design, only they lay flat—like the head of a sculpin (think flat head catfish.) Plus they are making an Articulated Shank you can use to easily create a long, jointed streamer. Now, this I am into! When I received this sample pack at the fly shop I quickly cranked out two more with the material provided. I used a #10 TMC 8089 hook because they are big, but light weight—thus easier to counterbalance with weight to force point up. The rest of the fly I made as simply as possible; dubbing underbody, rabbit strips over the back and a couple rubber legs. My analysis? The fly tying world is full of gadgets that come and go…but, these are pretty cool.

Friday, November 25, 2011

$17, One Hour and 15 Minutes

That is about what it takes to set yourself up for success this winter--roughly a 20 dollar bill and a couple of hours some Sunday afternoon when your team is getting blown out on the television by division rivals. This season has enough unpleasantness...favorite lakes are frozen over, it is already dark when work lets out and everyone in the country gets to witness how bad my Cleavland Browns are... But you don't have to add to all that a fly tying debt spiral. Choose the one fly pattern you know you will be pulling out of your box the most and take an hour or two to save yourself a good deal of cash. Pick the pattern that you use the most and that is the easiest and fastest to tie, and that takes the least amount of materials. This should be easy, because the best winter flies are tiny and simple. You can choose the RS2, Poison Tung or Zebra Midge. Here is the ingredient list for the $17 (for fifty!) Zebra Midge:

Umpqua Feather Merchants U201 #20
Two 25 packs of Spirit River Brite Beads 2mm (5/64") Black Nickel (or Silver)
Small Silver UTC Ultra Wire
6/0 Black UNI-Thread

There, $100 worth of flies...

Tuesday, November 15, 2011

Fly Tying (With Common Household Materials)

"Jay Fullum is one of Fly Tyer magazine's most beloved authors. His regular column, titled "Creative Tying," is a favorite with our readers."--David Klausmeyer, Editor Fly Tyer

Seriously...this is a great addition to your fly tying book library. It will stand out amongst the more conventional tying how-tos. Jay Fullum goes into detail about some real cool (and cheap!) everyday materials you probably already have laying around down in the basement...you know, "organized" loosely on that unfinished wooden Home Depot shelving you got right after you moved in. Yeah, you know what I'm talking about. Jay has chapters on plastic bags, foam packing material, weatherseal, embroidery floss, fake fingernails, paintbrushes and hair brushes. Lots of stuff. I love it. But, the thing I may love the most about this book is what this book can do emotionally to a beginning tyer. It erases this notion that a good fly has to be made with very specific ingredients. These are not tiny magic spells we are creating on a hook shank...they are tools of the sport of fishing. That is all. And you can use whatever works for you at the time. So, yeah...order a copy.

Lyons Press $21.95 Click Here!

Tuesday, November 8, 2011

Free Fly Tying Classes! (At RMA)

At Rocky Mountain Anglers we are approaching our fly tying classes a bit differently this Winter. We will be offering ONLY one-on-one classes and I will be very open to scheduling. The problems I have always found with the way Intro-Fly Tying has been taught is twofold. First: These classes have usually been group events (3 to 5 students) mainly to maximise the profits for the shop offering the class, not necessarily with the benefit of the beginning tier in mind. Second: We all are busy these days, so it is hard to make extracurricular things happen on the calendar. My intent is to get someone trained and as fluent as possible on the tying vise without delay. Hence the one-on-one classes with open scheduling...If next Tuesday morning before work is your only opening, then let's do it!
Fly Tying Classes are $25 an hour (We do gift cards!) but we are offering free classes with purchase of certain essential tying equipment....such as this Peak Rotary Vise (made here in Loveland, CO!) that sells for $149. RMA will honor two free one-hour tying sessions. With the perchase of a Dr. Slick 7-piece tool kit ($54) you get one free class.

Call Rocky Mountain Anglers in Boulder: (303) 447-2400

Wednesday, November 2, 2011

Krystowski Minnow (Step by Step Tying Instructions)

The Krystowski Minnow is one of my early original fly designs. I began tying this fly long before I was part of the fly fishing industry and a contract fly designer. It was at a point in my life when I had very limited time to spend behind a vise and, more influentially, when I had very little money to spend on tying material. I needed an all-purpose baitfish streamer that I could use for every occasion. I could not afford to have multiple fly boxes for every species of fish, but I was fishing everywhere and often. I needed a fly for river smallmouth, farm pond largemouth, Spring steelhead, Fall browns, wiper, walleye and northern pike. If I had a handful of Krystowski Minnows in my box I was all set. The fly needed to be cheap to tie, fast to tie and never fall apart...even after being chewed on by northern pike. I have old fishing buddies back in my home town who fish this fly over everything else. The fly is named after a family in northern Ohio who owned a small bass pond and would let me fish and invite me in for dinner. The earliest prototypes of this fly were fished in their pond.

Step 1: Begin with Gamakatsu B10S #2 hook. Create a ¼ inch thread base of black 6/0 UNI-Thread behind the hook eye.


Step 2: Tie in a clump of white Icelandic Sheep to “bottom” of hook shank.


 Step 3: Tie in a clump of chartreuse Icelandic Sheep on “top” side of hook shank.


Step 4: Securely mount ex-small white painted lead dumbbell eyes to “bottom” of hook shank. It is important that you wait until this point to tie in the lead eyes. Because the eyes are ex-small (this fly fishes best as a light-weight streamer) it is crucial there be distance between the arbor of the lead eyes and the hook shank. This ensures the fly swims hook point up.


Step 5: Tie in a clump of black Icelandic Sheep on top. Be sure to leave several inches of the black sheep hair extending out past the hook eye.


Step 6: Take the black sheep hair clump that you left extending past the hook eye and part it evenly. Be sure to leave the thread at the rear of the fly head.


Step 7: Wrap each piece of the black sheep hair back separately (being sure to cross between the lead eyes) and tie off and trim.


Step 8: Wrap black tying thread thoroughly over entire head of fly, being sure to secure any loose sheep hair and give the entire head an overall tightening. Then whip finish twice for durability and trim thread.


Step 9: Cut fly down to 2 ½ inches long (trim up the end nice and tapered). Then apply multiple coats of head cement over entire head, to include the painted lead eyes. I prefer at least five coats of Hard-as-Hull.


Friday, October 21, 2011

Saturday Tying Demo In Longmont!

The Longmont fly shop The Laughing Grizzly will be kicking off their free Saturday morning fly tying demonstrations this weekend! Come on up and visit with Mike, Dick and Frank in north Longtucky from 10:00 'till linch time. There will be bear bait (doenuts) and hot coffee for sure. I will be tying some new stuff, too...some Booby Frog action and some Clownshoe Stone Flies. Maybe this time I will even keep my clothes on...but all bets are off.

Friday, October 14, 2011

Conventional Wisdom Stumbles into a Room of Fly Tiers

The Geezus Lizard and Texas Ringworm are two bass flies that have finally evened the playing field. They have allowed fly fishermen to dabble into the not-so-secret voodoo world of conventional bass anglers worldwide. Their existence is born from a frustrated desire to turn what I had learned in my youth about bass and bass lures into a viable fly rod option, without loosing the life-like and traditional advantage of a hand-tied fly. Their conception consumed a large part of my adolescent and adult life. As a kid in rural Ohio and Pennsylvania, I grew up with an easy understanding of fish that liked to eat small bugs. I got trout. I understood bluegill, because they had an affinity toward bugs which were an easy size to cast with my noodly fiberglass fly rod. I even felt comfortable with the smallmouth bass in our local rivers…they at least liked to eat little soft-shell crayfish. I could easily tie and cast a slightly weighted brown woolly bugger! But the part of the Mid-West I grew up in was filthy with farms and fields and old barns…and behind every dilapidated old barn or back in every “Back 40” was an equally neglected farm pond full of largemouth bass! I would catch them easily on sparse bucktail streamers and small cork poppers, but the ones that ate were always the young ones…the one and two pound farm-ponders that were still small enough to get excited about a juvenile crayfish or crippled damsel fly. The big bass seldom showed any interest in my flies. To my great disappointment.

I joined the Army and left Ohio when I was eighteen years old. During the years that followed I spend a large amount of my time in training or deployed overseas, but was stationed at Fort Bragg, North Carolina were I was introduced to Southern Bass and a much more technical and refined way of fishing. And it wasn’t fly fishing. I learned about the Pig-n-Jig, the Zarra Spook and the weedless rubber worm…both Texas rigged and Carolina rigged. It was a bass-fishing rebirth for me! I found many largemouth bass…and large ones! But, when I got out of the service (the life of an infantry paratrooper is not kind on the body!) I hung up my spinning rods in favor of, once again, the fly rod. Since then I have lived and guided throughout Alaska and the Rocky Mountain West…chasing salmon and trout, but never ignoring my original love of the warmwater species. I would still sniff out a hidden bass pond any chance I got, regardless of the magnitude of the hatches on any local trout streams. And every season my flies would come closer and closer to matching the deadliness of those jigs and worms I used all those years ago.

The Geezus Lizard The creation of the Geezus Lizard hinged entirely on the conception of the ferruled dubbing loop tail. I have tried for years to build a worm-like fly, or fly appendage, to mimic the rubber worms conventional bass anglers have in their arsenal. The long, narrow look of a worm undulating and jerking near the bottom of a pond or lake is well known for triggering big bass strikes…conventional bass fishermen have know this for decades, one of the reasons long, soft plastics are one of the most frequently used lures. I tried chenille, rabbit strips and a whole assortment of other tying materials…but the end result always looked like a bag of chopped assholes leaked onto my tying desk. Once I grasped the concept of ferruling a long dubbing loop, it all fell into place. I used durable thread and dubbing wax and some real nice, long fibered dubbing that I could rake out. Then I sexed it up a bit by using two separate colors on either end of the dubbing loop, giving the worm a segmented look. The yellow tip on the tail was a nod to all the old “Mister Twister” tails on the jigs and soft baits. The rest of the Geezus Lizard is modeled after conventional lures like the Pig-n-Jig, only using crosscut rabbit strips and rubber legs. The only slight modifications were the true jig style hook and the wire ribbed scud back on the underneath of the fly. This does two things, it makes the fly look a lot cooler…and, on the practical side, it allows the fly to zip right back down to the mud after it has been jerked by the angler. This gives the Geezus Lizard a very unique action it the water, very closely matching the way a spooked crayfish darts out, then immediately tucks back to the bottom. This action has the same effect on bass as a four inch, wounded bluegill listing to one side and darting about erratically! The bass just have to pounce! I have fished the Geezus Lizard primarily for largemouth bass, but it has been a devastating fly for smallmouth bass, large trout, northern pike and some friends have even used it for reds off the coast of Texas ! It can be fished deep and slow, or fast and shallow…in rivers or stillwater!

Texas Ringworm This fly was designed for one simple purpose…to completely revolutionize the way we fly fish for bass in this country. To put fly fisherman on the same playing field as every conventional gear bass fisherman from southern California to the famous lakes in Florida. Every warm water fly tier has claimed to invent a fly that is the equivalent to the Texas-rigged rubber worm (one of the most commonly and effectively used tricks in conventional bass fishing). But almost all of them are no more than a ratty piece of chenille with some misshapen piece of rabbit hide glued to the end of it. But, once I had perfected the ferruled dubbing loop tail of the Geezus Lizard I had a decent “worm” taken care of…all I needed to do was to create an effective internal hook mechanism. This fly is absolutely deadly. I prefer to fish it with floating line when on small bass ponds and on a sink tip fly line when on a river or larger reservoir. The sink tip treats the fly just like a “Carolina rigged” plastic worm. In conventional bass angling the weedless-rigged rubber worm is such a mainstay because it is simple and easy to rig, appears natural and unhindered in the water and—most importantly—seldom fouls or snags. A fly equivalent to this lure is not commercially available. Whereas many hard-core conventional bass fishermen tend to fish larger bodies of water, the vast majority of the weekend worrier warm-water fly fishermen across the country spend their Saturdays not astride a Hunter bass boat on a large reservoir…but behind a neighbors’ barn harassing the farm-pond bass. The major handicap these fledgling fly casters have burdened themselves with (and what will, in the end, keep them forever loyal and tethered to the spinning rod) is a severe lack of proper fly-replacements for their go-to conventional lures and rubber baits. The Texas Ringworm is a simple fly to rig and fish when compared to its rubber-worm contemporaries. The hard-mono loop keeps the large TMC 8089 hook facing up and snag free. It stays in place even through the longest or brutal casting, but detaches immediately once a bass eats and the hook is set. Once the fish has been detached, the hard-mono loop is easily re-attached.

How To Tie The Geezus Lizard

How To Tie The Texas Ringworm

Buy These Flies Online!